The opportunity to extend functionality in Dynamics 365 BC with Power Automate is huge. One of the most critical concepts for me is the general ability to trigger flows, based on certain events or simply on demand, perform a automated / semi- automated business process or approval and then write back the decision as a change to a record in BC.
You can click finish as this point and review the new API page object that you have just created
Over in BC - a new vendor as defined by the params I supplied:
That's it, give it a try!
The standard set of API's are pretty great to get started on this - check out the docs here API (v2.0) for Dynamics 365 Business Central - Business Central | Microsoft Learn
However, sometimes the field you want is not defined or the record type has been added to the set yet. This can be a bit of a blocker. Thankfully you can create your own API very easily. This post is aimed at BC consultants who want to do just this using API pages.
Here is a similar exercise from MSFT for reference Developing a custom API - Business Central | Microsoft Learn
For this example below will create and publish a small extension that contains an API page to interact with the vendor table through OData web services.
We will use VS code Download Visual Studio Code - Mac, Linux, Windows and a few addons AL Language extension for Microsoft Dynamics 365 Business Central - Visual Studio Marketplace & AZ AL Dev Tools/AL Code Outline - Visual Studio Marketplace
Getting started
- Create a new AL in VS code project by tapping F1, use the AL:Go! from the command pallet
- Connect your project to a BC trial sandbox / CDX / other instance
- You will need to have full admin access and SUPER permission granted
 |
| Add a tenant definition line to the launch.json to define your tenancy ID, update the sandbox name if needed |
- F1 > AL: Download Symbols
 |
| This action gets the source code / lists of objects from the sandbox you defined above |
Create an API page
Now we are ready to make some new objects and deploy them to the sandbox as a DEV extension.
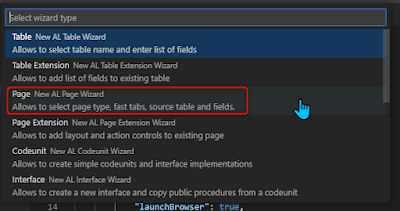
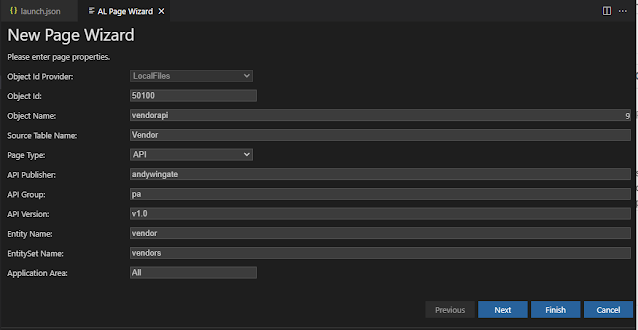
- Use the AZ New AL file wizard, from the right click menu or command pallet, to start creating a new object of type PAGE
- Object Id: Leave the suggestion and if you get stuck read this Dynamics 365 Business Central: View the all object details (Type, ID, Name…) and find out what extension an object belong to without using VS Code | Dynamics 365 Lab (yzhums.com)
- Object Name: Use something sensible here, you can have spaces
- Source Table Name: Start typing to filter all the tables in BC, this is the single table that all the fields in you API will come from
- Page Type: Set to API
- API Publisher: this best defines an organisational level term
- API Group: this best defines the type of API
- API Version: Set a version number
- Entity name: what is defined by 1 row of the table ?
- EntitySet Name: what is the collective term for many rows ?
Just to give a sneak peek on what the impact of those last few choices - this is how the API Page shows up in Power Automate, take not of the API Publisher, API Group, API Version and EntitySet Name. This may help you name the API page for best effect.
Back to the wizard - next we can pick which fields in include - or all them add. Naturally only add what you need! To test the performance I did add them all...
- The API page can be used to read and write data. Flow fields like 'Balance' etc can be read, but naturally cannot be written to. If in a later flow you try to write to a flow field the process will fail.
 |
| If you do want things in a particular order, define it here, or tweak the code of the file that's created |
You can click finish as this point and review the new API page object that you have just created
But before your API is available (as above) in Power Automate we need to publish the app to the sandbox
- F1 > AL Publish (ok ctrl+F5)
 |
| Publish without debugging will simply install / update the app on the sandbox and open BC for you on page 22 (that's what we asked it to do in launch.json) |
Now the app is published ok
We can check the extension on the Extension Management page in BC. The App is published as Dev. as we pushed it directly from VS Code. When we did the publish you will notice the .app file was also added to the folder. This .app file can be used to upload the ext to any environment. When you do this its published as type PTE.
- The main practical difference of PTE and Dev ext, is that PTE ext remain present when BC is updated. Dev ext are removed.
Additionally, in a Power Automate flow that connects to a company in this envienment we will also now see our new API.
Writing data
The API pages can be used to read and update records - the usual validation applies - but I now have access to all the fields I added during the API page creation (which was all of them!)
Save and test the flow
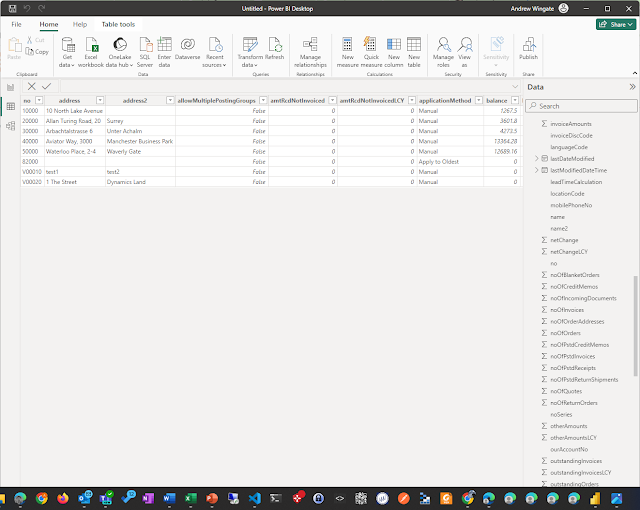
Data out - this API can also now be found in PowerBI for pulling out all the vendor data
Finally if you need the full end point URL of the API page - here is how to build it up -
https://api.businesscentral.dynamics.com/v2.0/<tenant Id>/<environment name>/api/<API publisher>/<API group>/<API version>/companies(<company id>)/<EntitySetName>
So we have all of that, apart from the company name which you will need to look up in BC from the companies page - get the system Id guid
Here is my API as a URL endpoint
https://api.businesscentral.dynamics.com/v2.0/b1c26eb6-ffc0-4887-b427-234b2db89ac4/sandbox/api/andywingate/pa/v1.0/companies(7368d553-0c5c-ee11-8df4-6045bdc89477)/vendors
Read more about URL formatting here Developing a custom API - Business Central | Microsoft Learn & Endpoints for the APIs for Microsoft Dynamics 365 Business Central - Business Central | Microsoft Learn
Tested using an OData feed in PowerBI
Source code of the vendor table API page here GitHub - andywingate/d365bc-api4pa


